This is a quick craft for kids. They'll have fun painting with a marshmallow!
You'll need:
3inch x 4 1/4 inch blue cardstock (or construction paper) and other paper scraps
white paint (tempera, craft, or acrylic)
gluestick or other glue
marshmallows (regular size) I had two for each crafter- one to eat and one to paint with. :D
Pour a small amount of paint onto a flat plate or plastic lid.
Dip the end of the marshmallow into the paint and print three big dots.
Print some more overlapping dots on the bottom edge of the paper for more snow.
While the paint dries, cut out snowman details. (I used a paper punch for the eyes.)
Glue on the details.
Add a string to the top if you want to use your snowman as a gift tag or ornament.
Make it a Wonderful Day!
Creating a Wonderful Life means teaching art, quilting, cooking, treasuring time with family and friends, and finding ways to make a difference. Thank you to the creative online community for sharing your ideas with all of us. And thanks for stopping by!
Monday, December 12, 2011
Sunday, December 11, 2011
Wednesday, December 7, 2011
Foil and Sharpie Name Drawing
This was a bonus project for artist who had completed their foil owls and leaves.
(It was also a great way to use up the scraps of poster board left over too!)
 I cut the scrap into 2x8 inch strips. They wrapped the foil over the board, just using the folds to secure it. The kids then used colored sharpies to write their name. They added colored shapes around their name, pressing a bit to push the foil down. They left spaces between the colors to create a leaded stained glass look. (Unlike the owl artwork, these do not have raised glue lines-just foil an sharpie. The pressure of the Sharpie just pushes the foil up a bit.) The piece is then taped to a larger scrap of the black poster board to frame it.
 Make it a Wonderful Day!
(It was also a great way to use up the scraps of poster board left over too!)
 I cut the scrap into 2x8 inch strips. They wrapped the foil over the board, just using the folds to secure it. The kids then used colored sharpies to write their name. They added colored shapes around their name, pressing a bit to push the foil down. They left spaces between the colors to create a leaded stained glass look. (Unlike the owl artwork, these do not have raised glue lines-just foil an sharpie. The pressure of the Sharpie just pushes the foil up a bit.) The piece is then taped to a larger scrap of the black poster board to frame it.
 Make it a Wonderful Day!
Monday, December 5, 2011
Owls, Foil, Glue, and Shoe Polish
 (original artwork by David, grade 5)
Art Club, Grades 1-6
This is one of my all-time favorite projects. The technique has been around for years, and I've loved using it several times with my students. This time around, our art is of owls and leaves.
We first planned our compositions, paying attention to all of the positive and negative spaces. We wanted to be sure they were all interesting. Here are some step-by-step instructions. Let me know if you need help!
1. Draw your picture on paper the size of your final cardboard. Just the big shapes, no details.
**I've noticed on Pinterest some people think we used coloring book images. Not so- we used our own drawings for these. We had owl photos and real leaves to look at, and I reminded the artists to keep it simple, fill the page, and no details. You could use coloring books, but the kid's drawings are so wonderful, I would hate to miss out on them!!
2. Go over your simple drawing with Sharpie.
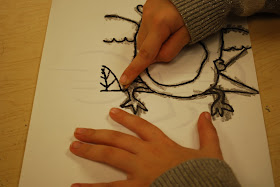
3. Turn your drawing over. On the back, use your pencil on it's side to go over your lines.
4. Place your drawing right side up on cardboard and trace over your lines for a graphite transfer to the cardboard. (Or, if you want to speed this up, just draw directly on the cardboard. I like to teach the transfer skill, something they can use on future projects.)
5.Go over with Sharpie if needed to see lines clearly.
 |
6. Use a thick, tacky glue to go over the lines and let dry.
 |
| (This image has the glue lines on it- they have dried clear.) |
7. Use a glue stick to attach the foil. (Shiny or dull side showing-you decide.)
8. Wrap the foil over the front and to the back.
9. Press foil down around dry glue lines. Use a paper towel over your fingers as you rub to avoid tearing the foil.
10. Then use a cotton swab up against the glue outlines once the foil is pressed down, just to be sure the glue outlines show up really well.
11. Draw patterns in all of the spaces with a dull pencil. (Use a variety of types of line and scales of patterns.)

 Once you've filled all of the spaces, rub over the whole thing with black shoe polish, wait a few seconds, and wipe off. (I use the kind that comes in a bottle with a sponge applicator lid.)


A couple of you have commented on the color- the results will be an aged silver metal look, something along the color lines of pewter. The golden effect in my photos is the result of reflected color from the walls and low light since I didn't use a flash.

 Yes. Lots of steps. A bit teacher intensive- I put the glue on at home. Times 150, that takes a bit of time! But the results are so wonderful!
I've used this in conjunction with illuminated manuscript in the past- so kids did a single letter with borders and lots of decorative patterns. And I think these would be perfect for Day of the Dead skulls...maybe some year I'll do that!
When I was hanging these up, parents, teachers, and kids all stopped to ask about them- I love being able to tell my Art Club artists how much people enjoy their art work! The most common word I heard was "WOW!!"
Make it a wonderful day!
Sunday, December 4, 2011
Sunday, November 27, 2011
Sunday, November 20, 2011
Thursday, November 17, 2011
Hip Cat
Sunday, November 13, 2011
Monday, November 7, 2011
CD Weaving Tutorial
 Finally! I've been trying to do a video tutorial on how to weave on a CD, but I've had technical problems. So photos will just have to do!
Thank you to everyone who has expressed interest in my weaving idea, and I'm so happy to hear some of you have already made these with your kids or students. Let me know if you have any questions, and I'll really try to get back to you!
Here's what you'll need:
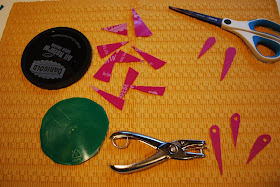
 (Old CDs, scrap yarn, scissors, and if you want to make the flexible needles, plastic lids, and a hole punch.)
To make the needles, cut the rim off the lid. Cut the remaining flat circle of plastic into pie shaped pieces, then round the top edge. Punch a hole in the rounded end to make the eye of the needle. Trim if needed. (You can use regular yarn needles, but I really like the flexible needle better- it's easy for the kids to thread, and I could have lots of them available at no cost. Some weavers preferred to not use a needle at all.) Update: I rounded the pointed end so it would be less likely to split the yarn.
 For this tutorial I've covered the CD with paper. (Just to avoid the reflection problem in the photos.)
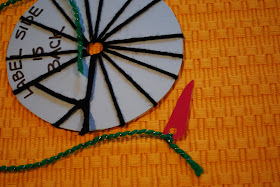
 To Warp the CD: A smooth yarn works best, and I used a thicker yarn for younger weavers. The warp yarn is between 4 and 6 feet long. Tie it to the CD by putting one end through the center hole and knotting it to itself on the back. Turn the CD over to the front, pulling the thread through the center and wrapping around the CD, creating the spokes. update: Make sure the warp threads are pretty tight!)
(You can prepare the CD looms in advance if you like. I had most of my classes make their own, but it does cut into weaving time. I had to teach many of them how to tie a knot. But I did love having the kids know how to do the project from start to finish, and then many of them were able to make lots more of these at home!)
 It's IMPORTANT to have the warp threads be an UNEVEN number. It's easy to check this by pushing the spokes together in pairs, making sure your last one is a SINGLE...
 The total number of warp threads can vary, as long as it's an uneven number. The fewer spokes, the faster it is to weave, but the looser the weaving will be, especially out near the edge. (I think it works well to have 13 or 15 for the younger kids, but some of my older students used a finer yarn or string and had as many as 25 or 27 warp threads. )
To keep the warp threads an uneven number without counting: As you put the threads on, keep them in pairs. Then add one more as a single. Knot the last thread on the back of the CD by tying it to the first thread. Then spread out the warp threads evenly on the front.
Now you're ready to weave!

Choose your first yarn. It will be the center of your weaving. Attach it on the back of the CD by tying it to one of the warp spokes.
 Knot the other end to the needle. Push the needle up through the center hole to the front side. Weave over under, over under. When you get near the end of your yarn, attach another yarn. I taught the kids how to tie a square knot. (I spent a lot of time helping kids get the knot tying thing figured out!!)
I hold the CD in my hand as I weave, weaving in a counter clock-wise direction. (I'm right-handed...) I push the needle under a warp spoke and then off the edge, repeating over/under for a few spokes before before pulling the yarn all the way through and then down and tight.
 When you add a new yarn, leave the tail long enough to tuck in after you've done a few more stitches so you can see where the knot needs to tuck in. If the tails are too short, they are harder to tuck in.
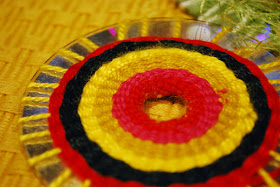
 You can use a variety of yarns, including textured and fluffy yarns. But they are more challenging to work with. I encouraged younger weaver to use smoother yarns, at least until the got the hang of it. When you get to the last round, end by tying the yarn to one of the warp spokes and tucking in the end.
I loved having a huge variety for them to choose from! I purchased many of the yarns from a thrift store (Value Village).


So there you have it- I hope that helps! Thanks to all of you who have expressed interest, and I would LOVE to see the work of your talented weavers!
Make it a Wonderful Day!
Sunday, November 6, 2011
Wednesday, November 2, 2011
October Qs, Continued...
 So Blogger is giving me fits again! But here are a few pics from our last meeting. The ones above are journal covers made by Helen. Wish my leftovers looked that cute!
The Santa pillow is by Denise..sorry, I only got a close up of her redwork, and not the rest of the pillow. More cuteness!
 Barbara brought her adorable fall pillow...
 And our hostess wore her Ghastlie apron-love the print!
 Oh, and here's a block Barbara worked out for the corners of her presents quilt. We all agreed it was too much work for us! But it will look great as part of her quilt.
 This is a cozy quilt by Denise...
 And there's more to come if Blogger will let me post them tomorrow!
Make it a Wonderful Day!
Tuesday, November 1, 2011
Halloween Quilt Group
 Our monthly meeting was at Nan's house, and she knows how to do Halloween!
And, since she just got back from a trip to France, we had a French-inspired meal that was delicious. Visit her over at Pots and Pins for yummy recipes...
 I had to share a FEW of her Halloween treats...


 ...and tomorrow I'll share our quilts!
Make it a Wonderful Day!


