 Finally! I've been trying to do a video tutorial on how to weave on a CD, but I've had technical problems. So photos will just have to do!
Thank you to everyone who has expressed interest in my weaving idea, and I'm so happy to hear some of you have already made these with your kids or students. Let me know if you have any questions, and I'll really try to get back to you!
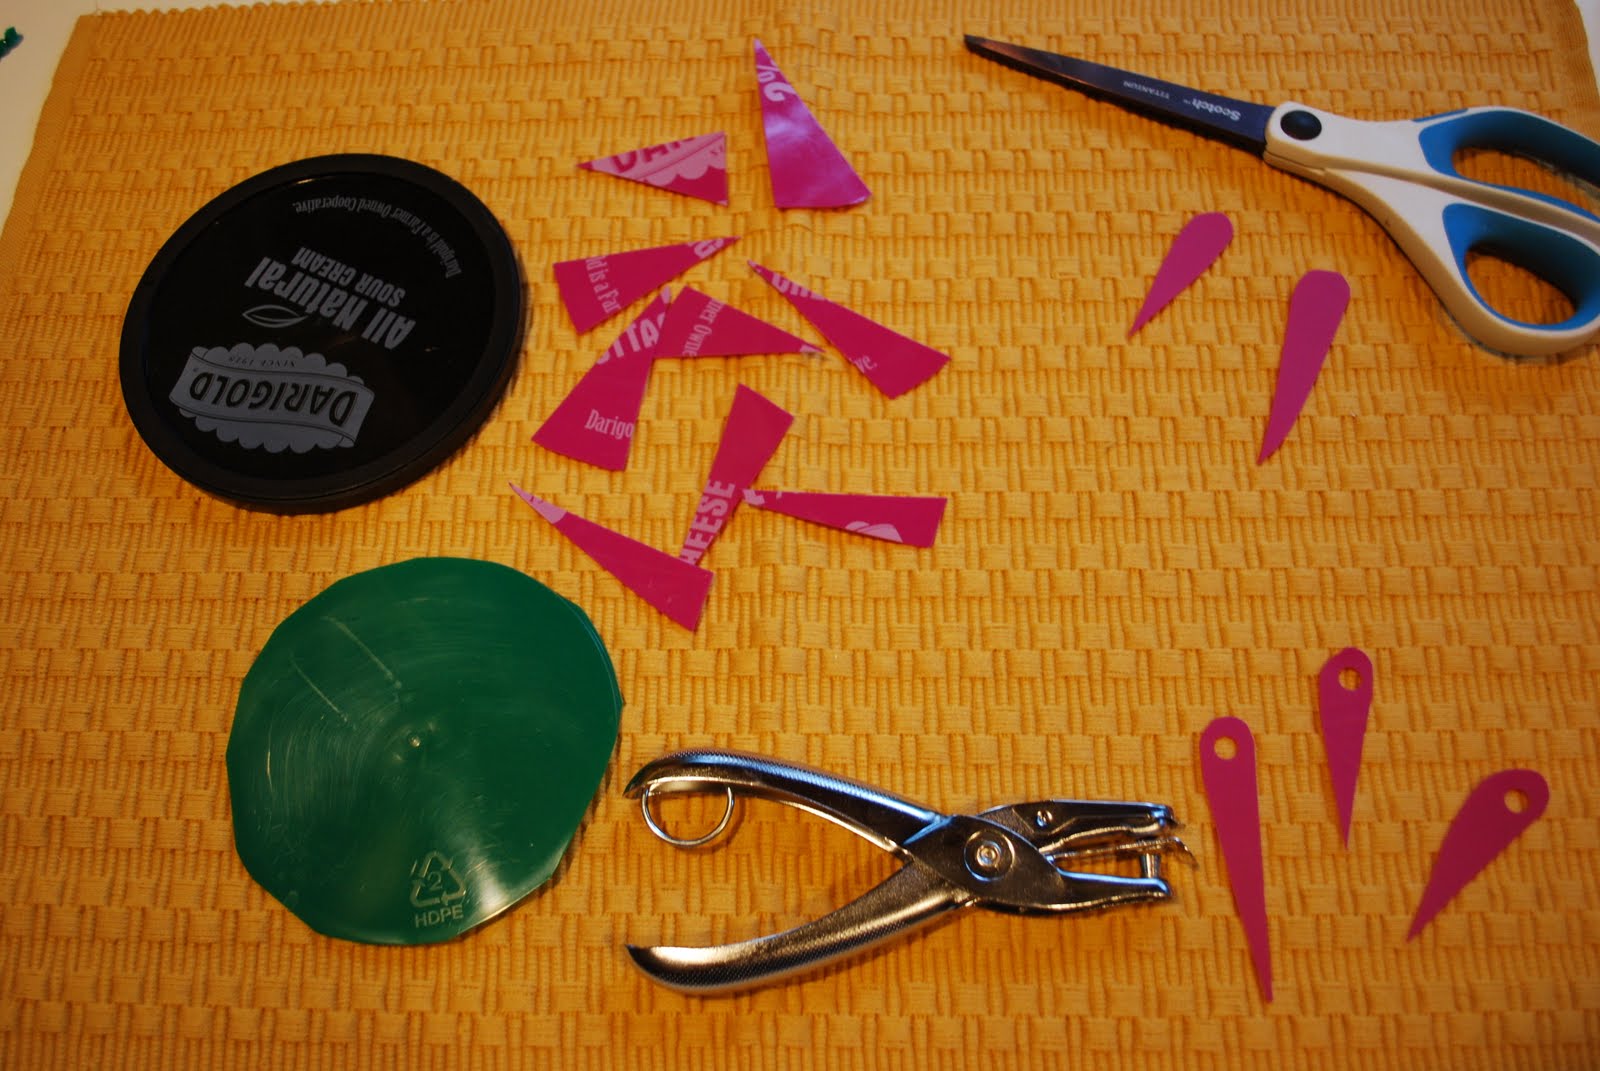
Here's what you'll need:
 (Old CDs, scrap yarn, scissors, and if you want to make the flexible needles, plastic lids, and a hole punch.)
To make the needles, cut the rim off the lid. Cut the remaining flat circle of plastic into pie shaped pieces, then round the top edge. Punch a hole in the rounded end to make the eye of the needle. Trim if needed. (You can use regular yarn needles, but I really like the flexible needle better- it's easy for the kids to thread, and I could have lots of them available at no cost. Some weavers preferred to not use a needle at all.) Update: I rounded the pointed end so it would be less likely to split the yarn.
 For this tutorial I've covered the CD with paper. (Just to avoid the reflection problem in the photos.)
 To Warp the CD: A smooth yarn works best, and I used a thicker yarn for younger weavers. The warp yarn is between 4 and 6 feet long. Tie it to the CD by putting one end through the center hole and knotting it to itself on the back. Turn the CD over to the front, pulling the thread through the center and wrapping around the CD, creating the spokes. update: Make sure the warp threads are pretty tight!)
(You can prepare the CD looms in advance if you like. I had most of my classes make their own, but it does cut into weaving time. I had to teach many of them how to tie a knot. But I did love having the kids know how to do the project from start to finish, and then many of them were able to make lots more of these at home!)
 It's IMPORTANT to have the warp threads be an UNEVEN number. It's easy to check this by pushing the spokes together in pairs, making sure your last one is a SINGLE...
 The total number of warp threads can vary, as long as it's an uneven number. The fewer spokes, the faster it is to weave, but the looser the weaving will be, especially out near the edge. (I think it works well to have 13 or 15 for the younger kids, but some of my older students used a finer yarn or string and had as many as 25 or 27 warp threads. )
To keep the warp threads an uneven number without counting: As you put the threads on, keep them in pairs. Then add one more as a single. Knot the last thread on the back of the CD by tying it to the first thread. Then spread out the warp threads evenly on the front.
Now you're ready to weave!

Choose your first yarn. It will be the center of your weaving. Attach it on the back of the CD by tying it to one of the warp spokes.
 Knot the other end to the needle. Push the needle up through the center hole to the front side. Weave over under, over under. When you get near the end of your yarn, attach another yarn. I taught the kids how to tie a square knot. (I spent a lot of time helping kids get the knot tying thing figured out!!)
I hold the CD in my hand as I weave, weaving in a counter clock-wise direction. (I'm right-handed...) I push the needle under a warp spoke and then off the edge, repeating over/under for a few spokes before before pulling the yarn all the way through and then down and tight.
 When you add a new yarn, leave the tail long enough to tuck in after you've done a few more stitches so you can see where the knot needs to tuck in. If the tails are too short, they are harder to tuck in.
 You can use a variety of yarns, including textured and fluffy yarns. But they are more challenging to work with. I encouraged younger weaver to use smoother yarns, at least until the got the hang of it. When you get to the last round, end by tying the yarn to one of the warp spokes and tucking in the end.
I loved having a huge variety for them to choose from! I purchased many of the yarns from a thrift store (Value Village).


So there you have it- I hope that helps! Thanks to all of you who have expressed interest, and I would LOVE to see the work of your talented weavers!
Make it a Wonderful Day!
Thanks Stephanie for the tutorial! I've pinned it to my Tutorials board on Pinterest....for when (and if) I find time ;-)
ReplyDeleteI can't wait to try this with some students or my own kids during the holidays!
ReplyDeleteThese are fabulous, great way to use the CD's! I did a similar project but we weaved on paper plate loom, but the cd seems to help the weaving keep it's shape. Beautiful!
ReplyDeleteMolly (artandideasthatgrow.blogspot.com)
Thanks a lot for sharing this tutorial and for visiting my site!
ReplyDeleteThis is going to be my extension project with 3rd graders after they do the plastic sour cream container weaving. I like this.
ReplyDeleteThank you for this lovely idea!
ReplyDeletewe made those in our homeschooling group. here are some photos at my blog. http://www.tapuz.co.il/blog/net/viewentry.aspx?EntryId=2210506&r=1
Do they stay on the CD when you are all done? Or is there a way to remove them and use them as coasters or something like that?
ReplyDeleteCarCar, You can take them off, but when you do, they cone up in the middle. I first tried that-but it meant tying off all the ends too, and because it wouldn't lie flat, I decided to just leave the weaving on and make the "loom" part of the art! It saved a lot of knots and I think they look awesome hung up together.
ReplyDeleteIf you weave on the label side, and leave the shiny side exposed, hanging them outside would be a pretty bird distractor for areas you don't want birds....and nests....etc.... like boat docks or patio furniture or pool chairs.
DeleteLovesss! I am so trying this!
ReplyDeleteWow! This is great. I've done this vertically with a paper plate with nice results, but this is beautiful! I'm putting it on my list to do next year when we talk about Native Americans and basket making. Thank you!
ReplyDeleteThis is a really fantastic activity. Thank you for sharing ....I can't wait to try this with my students
ReplyDeleteThank you so much for the super-clear directions!!! I have done paper plates quite a few times---cups and bowls are really fun too---with my older one, and of course for ME :) but I think the CD base is fantastic. Now I have to come up with some CDs...any ideas? I am so looking forward to this!! Thanks again!
ReplyDeleteYour very welcome! I guess they are kinda famous now. Happy weekend!
ReplyDeleteNaomi- thanks for stopping by! I didn't have any trouble finding CDs that people were happy to get rid of! I asked my students to bring some in, and they brought them in by the bagful!
ReplyDeleteThank you, this is a great idea for my young artist.
ReplyDeleteThis is the coolest thing I've ever seen using recycled items!! Thanks so much for this great idea!!
ReplyDeletethis is super cool! what a clever idea. i'm sending this post to my MIL who is a weaver.
ReplyDeleteBrilliant!!! Can't wait to try this!!!!
ReplyDeletewoww.. great tutorial... i have more old cd's.. and i will try to make them :D
ReplyDeleteHola que hermoso este tutorial me llevo la idea para mi blog, ya soy tu seguidora!! un beso
ReplyDeleteWhat a great idea! I'm thinking it might be possible to back them onto fabric and make some funky bags? Or you could crochet them together perhaps.
ReplyDeleteI'm sorry, I must have missed something. What do you do with them?
ReplyDeleteStephanie D- these were made to hang on the wall as an art piece. Check out the other CD weaving posts on my blog to see them hung up on the wall.
ReplyDeletehi, I like to feature your CD Weaving in our blog and facebook -
ReplyDeletecan I use the photo with link to this page? thanks!
Yes Manu, you can post and link. Thank you!!
ReplyDeleteThanks for the information. I think they would make wonderful hot pads. I crochet around CD's and they are my favorite hot pads.
ReplyDeleteThanks! I used this method for my last lesson. Your tutorial is great... I suggested others to visit your site.
ReplyDeletehttp://minimatisse.blogspot.com/2012/03/art-o-motion.html
Such a fantastic idea! We made Woven Power Amulets at our camp. It's a variation of another project called Power Amulets. We draw on CDs with sharpies and then the designs reflect off of T-shirts giving "power". Super fun, thanks! http://www.facebook.com/pages/Footfire-Soccer/444682875556384
ReplyDeleteThank you so much for this excellent tutorial! We are starting our CD weaves tomorrow! Can't wait!
ReplyDeleteYou're welcome! I'd love to see them!
Deletehttp://www.facebook.com/photo.php?fbid=380621738625423&set=a.184459664908299.41945.179324895421776&type=3&theater
ReplyDeleteI wanted to share a picture of my groups completed weaving project.
Thank you for sharing this lesson!
Best!
I have just done this with my class today as part of a project on umbrellas.Have not got very far as found that 30 children couldnt tie a knot! But, for the ones that persevered, the results are starting to look great. Cant wait to see them all displayed!Great instructions and idea for weaving needle that I would never have thought of.
ReplyDeleteHi! I know what you mean about tying knots! I'd love to see your results!
DeleteI am planning on using your idea for a weaving activity that integrates with South American studies. Your tutorial is very helpful! Thank you!!!
ReplyDeleteI'd love to see how they turn out!
Deletei'm planning to work on this...so i did compile this tutorial to be just one photo for my later use..
ReplyDeletehere's the link
https://plus.google.com/u/0/photos/111429453103342909917/albums/5876012595997656577/5876012600012645538
I love your website... so, many good ideas. I just wanted to let you know. Gloria
ReplyDeleteThanks so much! :D
DeleteI love this idea! I love the needles! I never thought of that! thanks so much for sharing! kathleen
ReplyDeleteThe needles work out really well- easy to thread, and easy to replace if you lose one, or need a bunch! :D
DeleteI noticed as I started weaving from the center you can see the spokes :( am I doing something wrong?
ReplyDeleteThe tighter the weaving, the less that will happen. It could also be that the yarn used for the spokes is thicker than the weaving yarn, which could also lead to the spokes showing more. But in many of the weavings that we made, that 'checker boarding" added to the weaving! :D
DeleteOh thank you! I continued to weave and yes you are right, it has created an interesting pattern. Just one more question, was abit confused abouyt the process for adding new yarn, do I leave the tail on the old yarn and start a new one straight from where I left off? How do I start on the second yarn? Like at the start u mentioned to loop it through from the centre. Hope that made sense, I'm so sleepy but really want to get my first cd finished :) xxx
DeleteOh thank you! I continued to weave and yes you are right, it has created an interesting pattern. Just one more question, was abit confused abouyt the process for adding new yarn, do I leave the tail on the old yarn and start a new one straight from where I left off? How do I start on the second yarn? Like at the start u mentioned to loop it through from the centre. Hope that made sense, I'm so sleepy but really want to get my first cd finished :) xxx
DeleteOh thank you! You were right, it has created an interesting pattern. Another question, sorry I was just slightly confused by how to start with the second yarn...do you leave the tail from the first one and start the new one from where I left off? Like you mentioned at the start u loop the yarn through the centre of the cd...but where do u weave the new yarn from?
DeleteJust tie the new yarn to the end of the one you just wove, on the front. Take a couple of over-unders to make sure the knot is where it will end up, then tuck in the knot tails. (Use your needle to tuck them under your weaving. Keep going, making sure to pull the weaving as firmly as you wish. When you get to the end of that yarn, add the next and so-on. When you get to the end of the last yarn, knot it around one of the spokes and tuck in the end. I'd love to see yours when you get it finished! :D
DeleteAh yes I am with u know, sorry I was being so slow! Can u also remove the cd? I will post photos soon :), thanks again xx
ReplyDeleteIt's not meant to be removed from the CD. If you choose to remove it,the weaving will pull into a bowl shape because the weaving is tighter in the center. Also, in order to remove it, you will need to cut the warp threads, so they would all need to be knotted. Lots of knots! :D
DeleteI just LOVE this idea! I'm thinking gifts from the kids for Christmas! Thanks for sharing! :) Lisa
ReplyDeleteThis is a really fantastic activity.All cd's are looking different from one another.Thanks for sharing.
ReplyDeleteKids cds
Hello. My art class made this yesterday. They turned out great. They had all kinds of texture and fluffiness. I liked it. One student brought a scarf that their sister made by weaving. Thank you.
ReplyDeleteGlad to hear you enjoyed it!! Thanks for saying thanks!:D
DeleteMe ha gustado muchísimo la idea. Muchas gracias
ReplyDeleteI'm weaving mine right now! The colors I'm using are pink, blue, lavender, and white!
ReplyDeleteMe encantaron, los voy a hacer con mi hija de 5 años, gracias!!!!!!!!💜
ReplyDeleteDo you mean warp or wrap?? I'm confused! Or do we somehow warp the actual CD in an oven to soften first?
ReplyDeleteWarp is a weaving term. Don't heat the CDs! :)
DeleteThank you so much for sharing this tutorials ... will try with my class (ages 6-9), hopefully they all could follow this simple instructions well :-)
ReplyDeleteThank you so much for sharing this wonderful project. I am doing it with the entire primary school this term. I'm wondering how much yarn is required per cd? I have 550 students all creating one and I'm asking each class to bring in one colour, which would mean a total of 550 balls of yarn varying in colour (tone) and size. I'm going to have leftovers but hopefully enough variety to create a work of beauty. How did you plan the colors?
ReplyDeleteSo glad to hear you will be doing this! I didn't measure the amount of yarn per cd, but it sounds like you should have plenty with them each bringing some in! I talked to the kids about color (warm, cool, contrast, etc.) but I really let them choose the colors and textures they wanted to use. Many of them chose combinations of yarn I might never have used, but the end result, especially with them all together, worked. I hope the yarn you have will include a variety of thicknesses and textures, as that adds so much interest to the final weavings. I would love to see photos when your work is completed!!! :D
DeleteWhat a great idea for recycling old CD's! Thanks for sharing your ideas and lessons. They are just the way I like them, not overly stiff in structure and open to flexibility Thanks for sharing..
ReplyDeleteThanks! I refer to my approach as "freedom within a framework". I try to avoid cookie cutter projects, but also move kids past what they might do in the "do whatever you want" approach.
DeleteCan you weave on both sides of the CD and then use as a mobile?
ReplyDeleteYes, you could, but you'll have a couple of knots that you'll have to tuck in. :D
DeleteThis is such a neat idea. I'm planning to try this with our homeschool group on our next craft day. I did have a question about the yarn. Did you pre-cut lengths of yarn for the kids to weave? Or did you just let them weave with a color until they were ready to change to a different one?
ReplyDeleteHi! I cut lengths to make it easier for kids to manage. I think about 18 inches is a good length, but you can use any length you are comfortable working with- you have to pull the thread through after two or three "over-unders". Have fun!! :D
DeleteGreat! Thanks!
DeleteThank you very much for having such a well designed and photographed blog! I appreciate the time it took to do this. I will definitely cite you if I use this project!
ReplyDeleteHappy ARt making!
Hi Stephanie! I would love to use this as a Take & Make craft for the teens at my public library. Would I have permission to use a few photos and instructions if I gave proper credit to your blog?
ReplyDeleteMe too for our library please!
DeleteHi. Sorry I didn't respond Stephanie! Yes, you have permission, and thank you for credit to my blog too. :D
DeleteI did this today with my granddaughter and two of her friends (ages 9-11). The hardest part was doing the warp (getting it tight enough). After that, we sat around singing and weaving. Each of theirs is beautiful and different, just like they are!
ReplyDeleteSo happy you all had fun together! :D (Thanks for sharing with me- a smile on my face from you!)
DeleteI took the supplies to make this craft to a family reunion last week to keep the kids entertained. The girls ages 6 to 12 loved doing it. I sent extra supplies home with each of them, to make the trip home more fun and enjoyable. Thank you so much for sharing. This project was a huge success.
ReplyDeleteI'm so happy to hear your family had a good time making CD weavings! (And thank you for taking the time to let me know.) :D
DeleteThese are beautiful. One of the Grade 5 teachers at my kid's school is planning to do this activity with his students (most age 10), and I'm doing some of the legwork for him. How much time should he plan for to complete this project? Thanks in advance for you answer!
ReplyDeleteThank you for sharing this. It's really amazing ☺
ReplyDelete