Here are the CD weavings my students made. I love the variety!
Each student made at least one. As with every artist and every project, some worked more quickly than others. I cut out "needles" from plastic lids, then used a paper punch to make the "eye". The flexible needles were easy to use, and the large eye made threading easy enough even for my youngest students.

The artists changed yarns as frequently as they wished, but I encouraged them to finish the yarn on their needle just to avoid wasting it. The knot was tucked in under the weaving.
 I attached the disks to each other in columns with twist ties. The top disk has a twist tie loop so the column can be push pinned to the wall.
 The sign for one of my schools is made from a cake cardboard I happened to have on hand...


You can see how some of these are really dimensional. The thicker the yarn and the tighter the weaving is pulled, the puffier the piece.


Make it a Wonderful Day!
Hey, Stephanie...I absolutely love these and your display. I've posted a link over at my art bulletin board blog. I hope you don't mind. jan
ReplyDeletehttp://bulletinboardstoremember.blogspot.com/2011/06/fabulous-woven-cds-on-display.html
These are just beautiful. The nicest weaving project I've seen with kids!
ReplyDeleteI did circle weaving for the first time this year and they loved it. I think the CDs and the way you displayed it really add some extra excitement!
ReplyDeleteWhat a super-fun idea! The kids have done a great job!
ReplyDeleteStephanie, these are so darn cute!!! What a clever idea and fun craft for kids! I am sure they had a blast making them....awesome!
ReplyDeleteHi I just found this post through a Pinterest board, and I love it. I have lots of old CD's in my classroom already. One question: how did you attach the warp to the CD? Did the kids have a hard time with warping a slippery CD?
ReplyDeleteamazing! now I know what to do with those dvds that won't play, could make good fruit tree bird scarers too
ReplyDeleteLove this so much! Thank you for sharing this amazing project!
ReplyDeleteThis project looks awesome! I'd also like to know how you warp the cds. I'm sure it's not too hard, but any tips/tricks would be appreciated! j baker (at) ball state (dot) bsu (dot) edu
ReplyDeleteThanks!
ohmigosh! i love these! definitely adding them to our repertoire this year...and I'm known for recycling the most ridiculous things to make artwork! do you just wrap the warm around and around through the hole? i'm assuming so...thanks for posting!
ReplyDeletewww.ourartlately.blogspot.com
I LOVE this idea..esp since I did a CD recycle project last year with my students!
ReplyDeleteI've never taught fibers with my students, and was wondering how you you even start this lesson? Someone mentioned the term "warp" the cds How do you get the thread to stay in the middle like that? Would LOVE if you would share a step by step tutorial and or lesson plan!!! my email is cassiemae82@yahoo.com I've been teaching art for Seven years, and have never seen a lesson quite like this! Very excited to hear from you!
fantastic lesson, thank you for sharing!
ReplyDeleteI am so excited to try this!! Thanks for sharing!
ReplyDeleteI would love love love the step by step instructions for my kiddo thanks!
ReplyDeleteI would also love the steps to get the students started.Is there a post somewhere? It looks so fun and I thing the kids would love it.
ReplyDeleteSue
sw@ssummit.org
I just found this lesson. What a great idea!!!!I will be doing this tis year with my students.
ReplyDeleteThanks for sharing!
Beautiful and fun! Just wondering about the warp strings. Any tips?
ReplyDeletelcoffman@afcschools.net
I abosolutely love this idea! Like so many of asked, I would love to get the steps for this project. My kiddos would love it! Thanks so much!
ReplyDeleteAshley - kinnera@centergrove.k12.in.us
I have added a link back to your blog from mine:)
ReplyDeletewww.ourartlately.blogspot.com
I loved this project of yours when you first posted it and finally got around to trying it with my students. They're not as gorgeous but thanks for the inspiration!
ReplyDeletehttp://useyourcolouredpencils.blogspot.com/2011/11/weaving-on-cds.html
I love it...we did straw weaving last year and my students are begging for another weaving project! Can you give step by step instructions for those of us that need visual and print instructions? Thank you!
ReplyDeleteCan you describe in more detail how you made the needle? I'm having a hard time envisioning it.
ReplyDeleteAwesome-- and planning to do with this my son's 1st grade class this week.
I'm posting a step-by step tutorial on Monday! Sorry it's taken SOOOOOO LONG!!!
ReplyDeleteWas the tutorial ever posted for this? I can't seem to find it and am very curious how you got the warp to stay on the CD. My concern would be it slipping off as they are working leading to frustration.
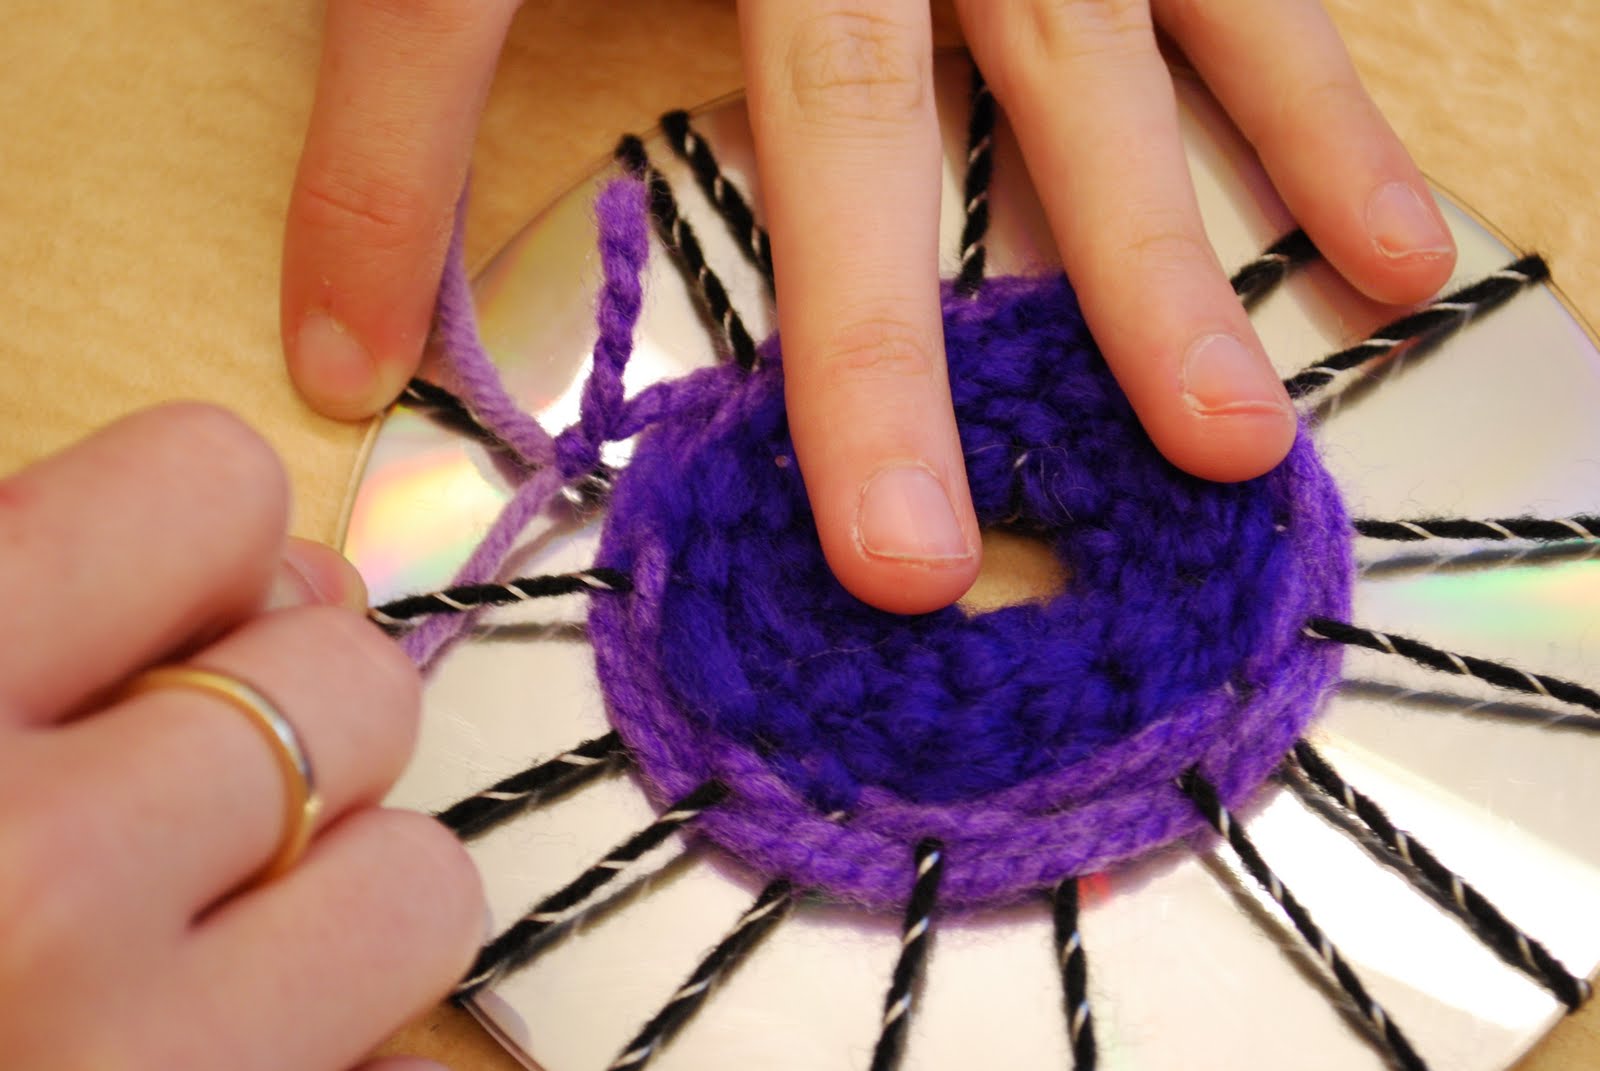
DeleteYes! Go to the top of this post and click on the word "HERE". That's a link to the tutorial.
DeleteThe warp doesn't slip off- the threads go through the center of the CD. Let me know if you give it a try. :D
Wonderful!!
ReplyDeleteHi sallgood,
ReplyDeleteNew Follower. Fellow Art Educator. Would like to feature this on my tumblr page for other art teachers. Would you mind a link?
http://briarroseartstudio.blogspot.com
http://scottishroseartstudiollc.tumblr.com
Mrs. Bacon, I'm happy to have you link!! Thanks for your interest! :D
DeleteWhat a fun project! I shared a link on my "Spending Time with Avery" Pinterest Board. Thanks.
ReplyDeleteBrilliant! I've wanted to make a weaving board but this is such a simple and effective weaving method. And the results are beautiful!
ReplyDeleteI made this once..It was so cool!!
ReplyDeleteNice to do with children! I hope you don't mind that I made a pin on Pinterest.
ReplyDeleteThank you for all your nice work.
Joanne
They are cool.We are going to make some of them. They are a wonderful thing to make. i love them.They are a wonderful colour.
ReplyDeleteI am so impressed with what your students were able to accomplish ! I'm a little unsure about how you used twist ties? also what do you think about drawing the lines on the cd's for the younger children to see how to weave it on his own. will a marker work on cd's? thanks so much my almost 5 year old great niece is coming to play next week and I think I may have some of these ready and give it a try with her. Love it!
ReplyDeleteKathleen, the twist ties were used to attach the CDs to each other in columns for hanging. I don't know about marking the CD-because as you go around, you are under on one round and over that same spoke on the next go around.So I'm not sure what you would mark.
DeleteFor younger children, I think the best thing is to use a thicker yarn, and to work together with an adult. :D Let me know if you make them with your great niece!
These are great!
ReplyDeleteThese are great!
ReplyDeleteBrilliant! Love the needle idea! I'm into circle weaving and love that you are introducing this to children! HipHip Hooray!!!!
ReplyDeleteLoved this idea, currently making this mural idea with my seniors who have dementia...awesome, they are having a blast and it is very forgiving....like a quilting bee....we are almost ready to install outside in the patio area then inside for the winter,,,can't wait for the sun to catch the silver on the disc....thanks for the great idea and the many hours of reminiscing!
ReplyDeleteThis is a really fun idea. I did it with a mixed age group of kids and they all loved it! I taped the thread onto the needle with a small piece of masking tape so even the little ones could keep the needle threaded.
ReplyDeleteI also used two CDs with the print sides together so that both sides were beautiful. Some chose to weave on both sides and others just wanted to weave one side. Either way they were very proud of their weavings.
Thank you for sharing this wonderful idea.
Estan muy creativos y eso los hace bonitos
ReplyDelete